Adding a Storage Disk To Linux
Adding storage to Linux systems is a very common everyday administration task - especially in virtualized environments. While in many enterprise-grade systems this is done through Logical Volume Management (LVM), being able to add a simple disk to a physical or virtual server is still a common and critical skill. This brief article demonstrates the procedure.
Connect a New Disk
The setup of the Linux system will dictate how to connect a new disk. If its a physical computer, actual hardware will need to be added (as in, open the case/rack and physically attach a new disk, not covered here!). If its a virtual machine, the steps will vary by hypervisor, but are similar to the procedure below.
In this example, Virtual Machine Manager will be used - this is a wrapper around KVM/QEMU hypervisor. Other hypervisors include VMWare, Virtualbox, and Hyper-V.
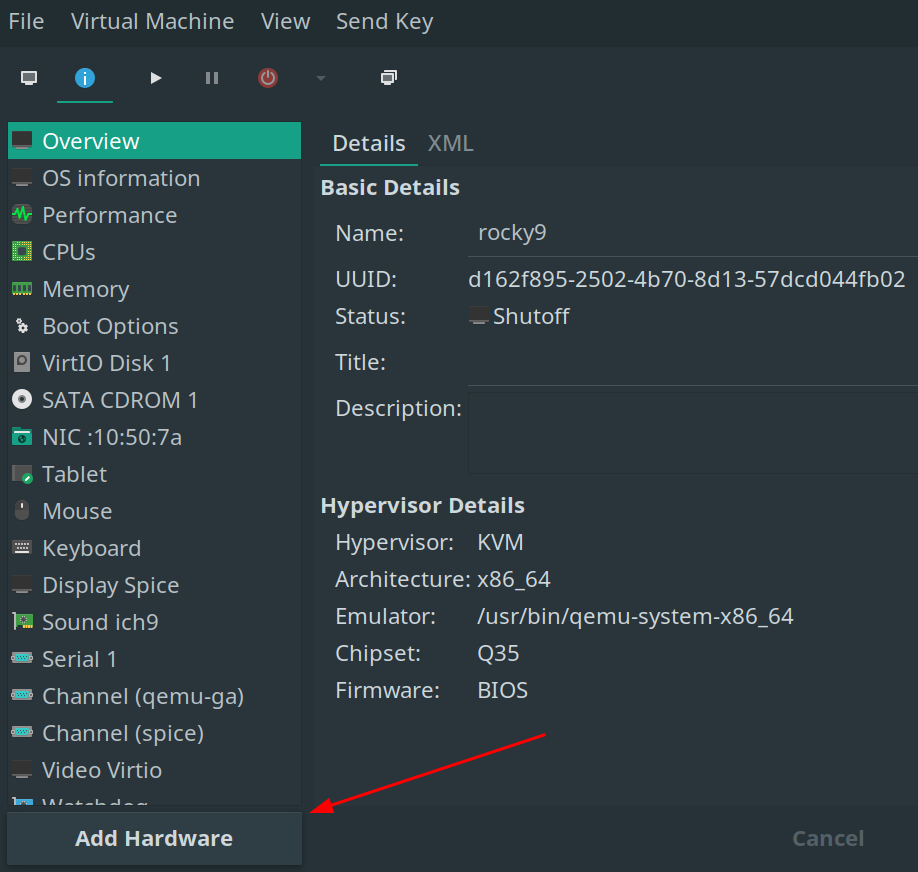
Adding a disk in Virtual Machine Manager is simple. Navigate to the Virtual Machine information panel, and click “Add Hardware”:
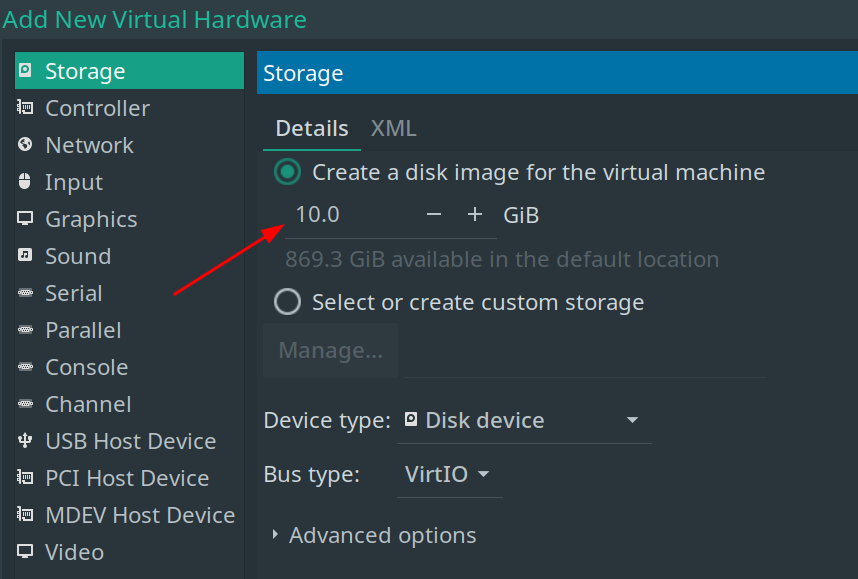
The size of the disk to add is entirely dependent on the space available - for this demo, we’ll add a couple of 10GiB virtual disks:
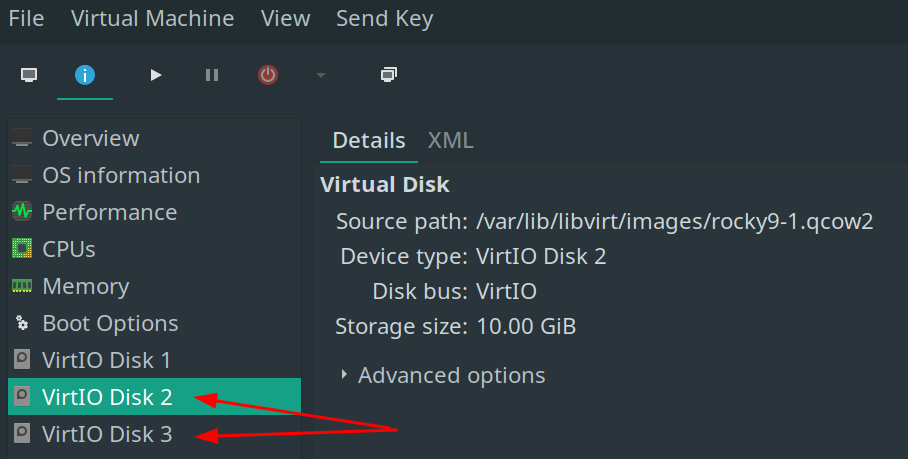
Once added, the disks will show up as hardware for the VM:
Find the Added Disks with “lsblk”
Boot the system, login, become root, then use the lsblk command to find the device name of the disk(s). Depending on the hypervisor being used, this could show up a variety of different ways such as sdb or vdb:
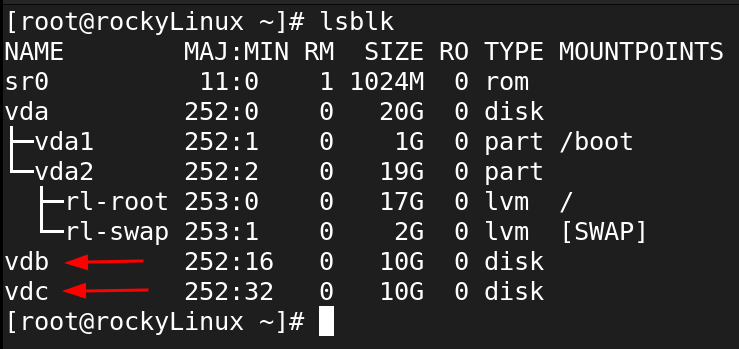
The new disks added are labelled vdb and vdc. Within the file system, they can be found at /dev/vdb and /dev/vdc respectively:

Note that this entire demo will be performed as
root- it rarely makes sense for a normal user to manipulate storage.
Use “fdisk” to Create a Partition Table
New disks usually don’t have a partition table - meaning they are not useable yet. There are two different kinds of partition tables - MBR and GPT (also known as GUID). GPT is newer (and better!) and we’ll use it for this demo.
fdisk is the utility most Linux administrators use to manipulate disks, although there are other options such as gdisk and parted. We’ll use fdisk - issue fdisk /dev/<diskName> to open the new disk with the utility, then create a partition table with g, and write the changes with w:
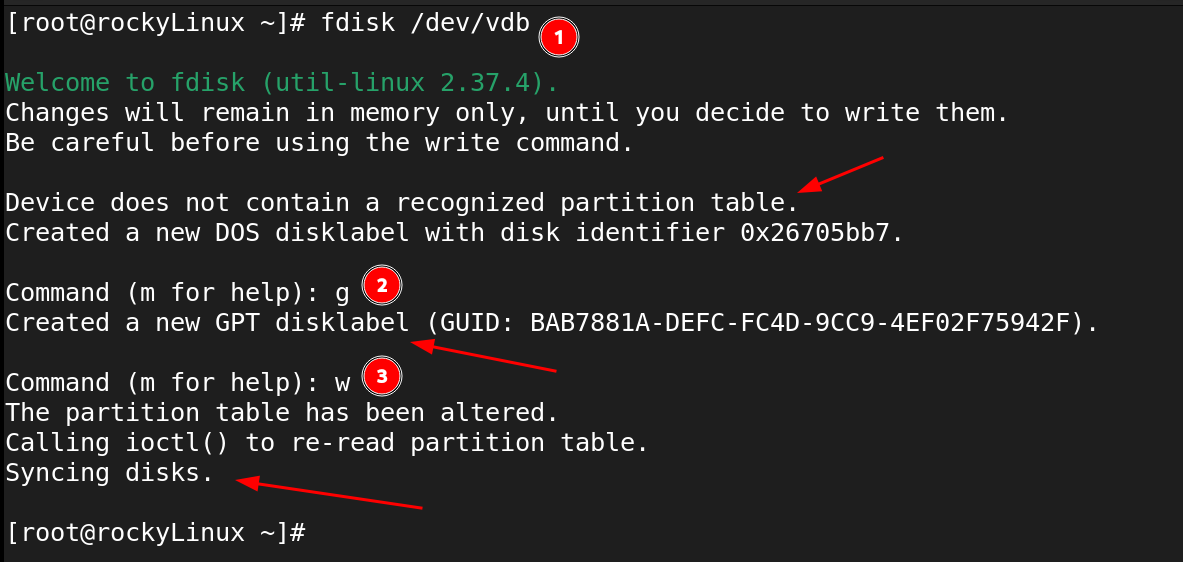
Help inside
fdiskcan be found withm(some think of it asmfor Menu)
Use “fdisk” to Create Partitions
Reopen fdisk for the vdb disk, and start creating partitions as needed. For this demo, we’ll create a 1GiB partition (but this is totally arbitrary!). Use the n command to create a new partition on the disk, specifying the partition number, the starting sector, and the ending sector (or the requested size of partition):

Note that in “Step 4” above, pressing “Enter” will accept the default proposed by
fdisk
Validate Partition and Write to Disk
Still inside fdisk, issue p to view the partitions as they have been created, making sure that the configuration is as required. Once this is verified, issue w to write the changes to disk.
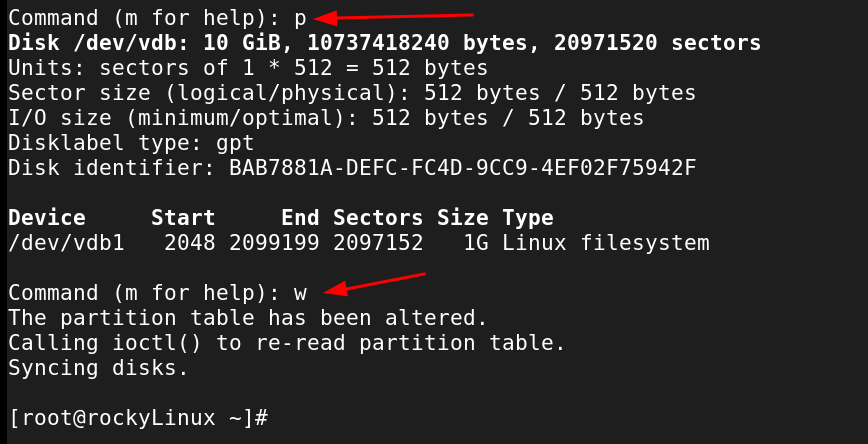
!! Repeat these steps to create another partition on the disk that was created.
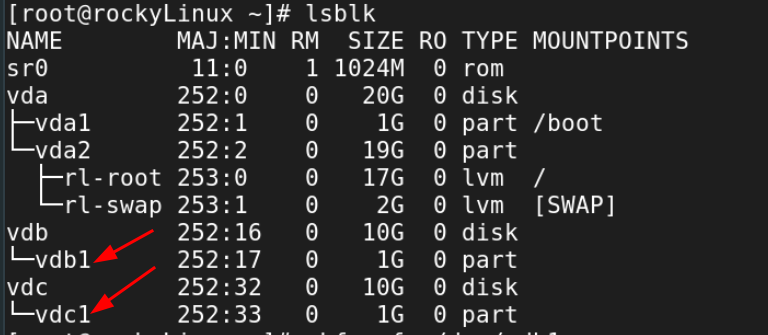
Once both partitions are created, a simple lsblk should show both disks with partitions, ready for the next steps:
Make a File System On the Created Partitions
Partitions are containers to hold file systems, which is the useable storage space for the end user. Creating these just requires a mkfs.<filesystem> <targetPartition> command:
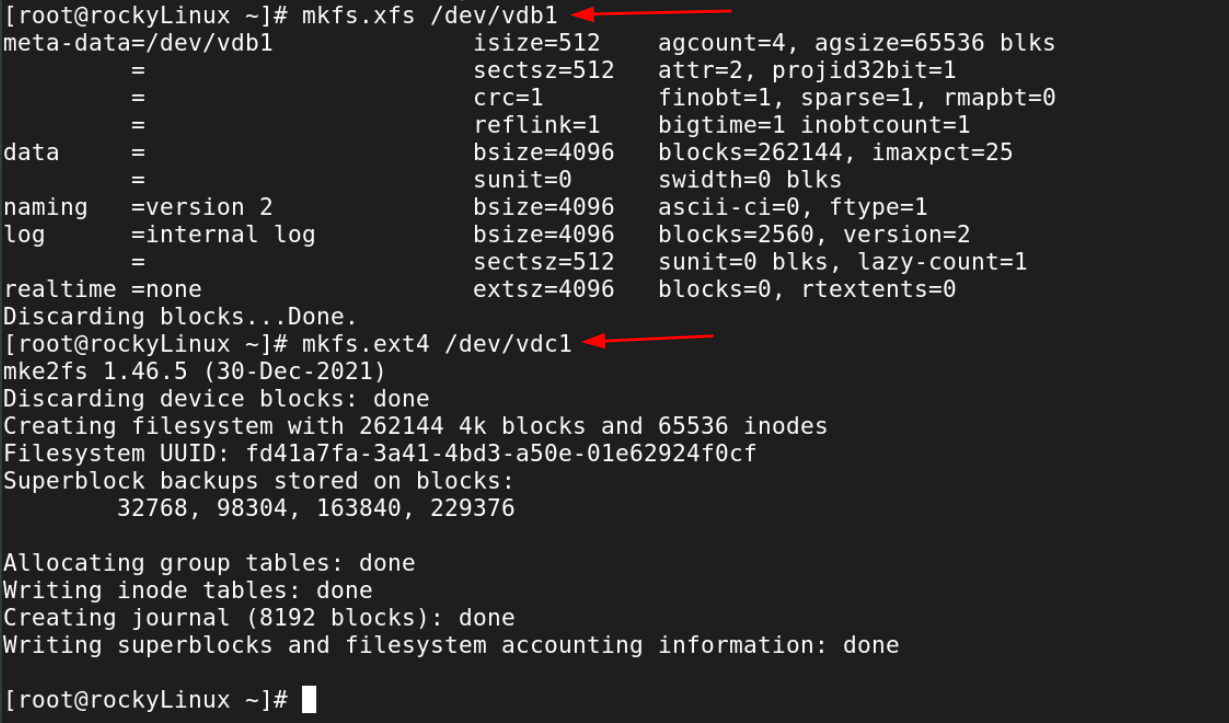
Just for fun, we created two different types of file systems, one
xfsand the otherext4. File system types are a big topic, but these are two very important types.
Create a Directory for the File Systems
Unlike in some other operating systems, newly available storage doesn’t show up as a new drive letter. Rather, the new space will need to have a place assigned within the Linux File System Hierarchy. Of course, these can be named virtually anything, in this case, we’ll choose /app for the xfs storage, and /db for the ext4 storage. Simply create directories with the standard mkdir command:
sudo mkdir /app /db
As below (using root, therefore no sudo):

Make a Backup of “/etc/fstab”
In order for mounts to persist through reboots, it is necessary to add them to /etc/fstab/ - a critical file - that if incorrectly formatted can cause booting problems for a Linux system. To safeguard against this and create a rollback plan, make a backup of the existing /etc/fstab configuration to ensure system recoverability. Issue the command cp /etc/fstab /etc/fstab_bkup (with sudo if needed):

This backup of /etc/fstab will be the rollback point if there is difficulty in booting the Linux system. We’re now ready to add each new disk to /etc/fstab and test to see if the mounts are working as expected.
Make the Mounts Automatic and Permanent
Best practice for adding a device to /etc/fstab is to add the device by label or Universally Unique Identifier (UUID). This could be gathered by copy/paste and mouse clicks, however, that option is not always available. Here is how to add the UUID of a device to /etc/fstab without using a mouse:
blkid | grep vdb1 | awk ' { print $2 } ' >> /etc/fstab
Note that this APPENDS (
>>) to/etc/fstab. Do not overwrite/etc/fstab! (But if that happens, simply revert using the backup taken above!)

As above, it is highly recommended to confirm the output of the command is as expected BEFORE appending it to
/etc/fstab. This kind of “trust but verify” mentality will save many blunders in the command-line.
Once the UUID is added, edit /etc/fstab and make sure the line is as follows:
UUID="<yourUUID>" /app xfs defaults 0 0
In our example, /etc/fstab now looks like this:
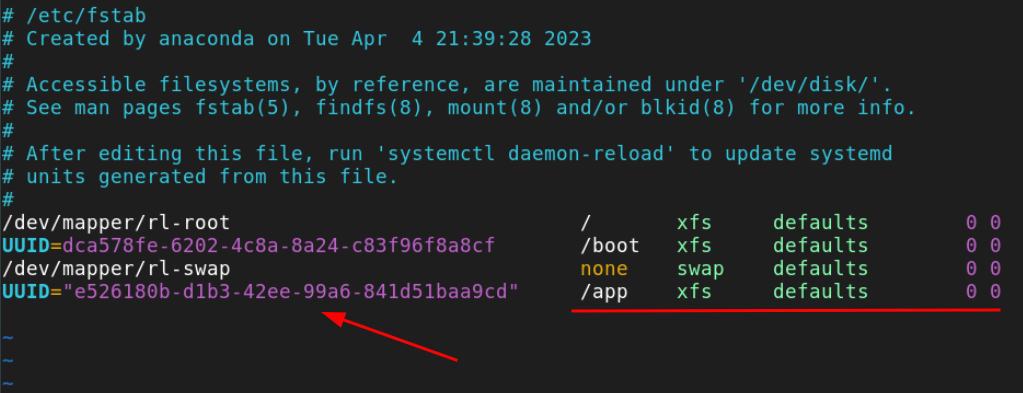
Repeat these steps to add the other mount point. The finished /etc/fstab should look like this:
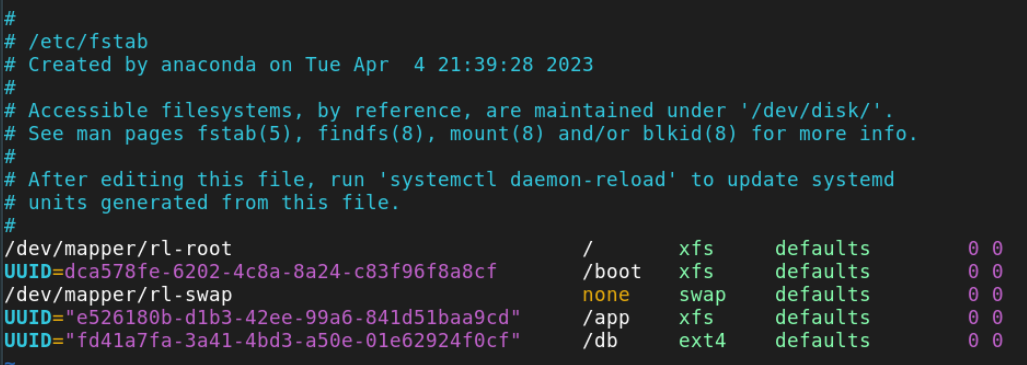
Mount the New Storage
After saving /etc/fstab with the above changes, the Linux system should now pick up the new mounts with a simple command:
mount -a
Validate Storage is Accessible
Verify both disks are showing up and that there are no issues with:
mount | grep vd[bc] # will vary depending on setup/hypervisor
findmnt --verify
For example:

A couple other checks could be:
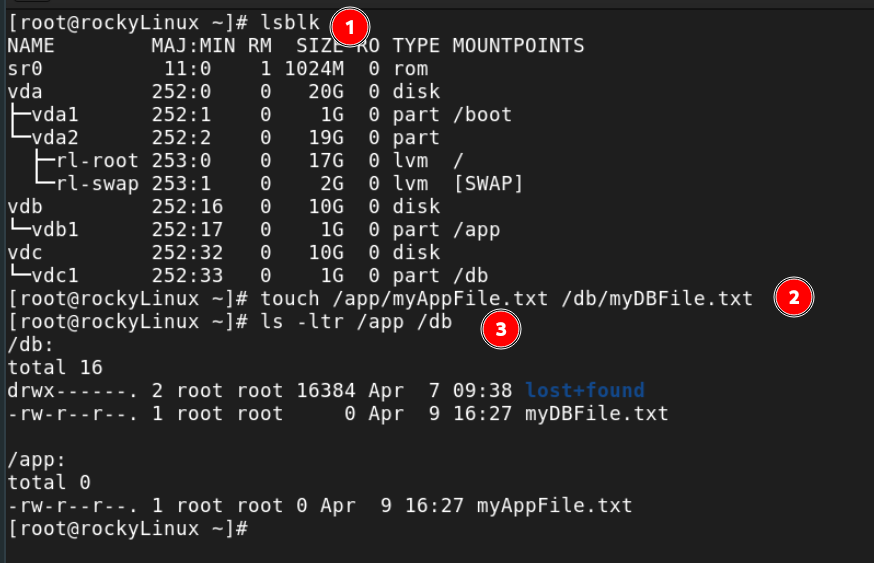
And as a final check, reboot the system and make sure everything is still in place upon restart. If the worst happens and the system won’t boot, simply delete the modified /etc/fstab and replace it with backup version with (the system will drop you into a root shell to do this):
cp /etc/fstab_bkup /etc/fstab
Go add some storage to a Linux system! Enjoy!
As mentioned above, there is also a
partedutility which works with storage disks. Please check out the video below to view a similar demo usingparted.